Our SL500 R129 1996 Restore Proejct
Das Silver Bullet gets a facelift, one part at a time!
Thursday, July 25, 2013
A little after work project, OEM Sport AMG style pedals.
Once again I found myself trolling on Pelicanparts.com and found a deal on AMG/Sport Pedals. So after ordering them, they show up today and I must install them tonight!
So here is what the old looked like, the default 16 year old black pedals.
Here are some instructions for installing them.
Parking Brake pedal:
This is the easiest of them all. Simply pull the old rubber from one corner and put the new on starting from the upper left corner then to the upper right corner then down to the bottom left>right corner.
Accelerator pedal:
1, Undo the two plastic 10 mm screw caps behind your gas pedal, pull out the pedal mounting pin from the right to left and remove the old pedal.
2. Attach the new pedal back to the floor of the car with the two 10 mm screw caps that you removed in step 1.
3. Line up the the upper mounting pin by finding as I did that it takes some paience to mount this pin.
Brake pedal:
Take off the old pedal cover and put on the new one. The main brake pedal is a little difficult, use a little silicon spray because the rubber is sorta hard, so you may need a tool like a flat head screwdriver to pull the rubber sleeve over the pedal. Start at the top upper left corner then to the upper right. Finally the lower left corner, drawing to the lower right corner over the pedal.
And after 20 minutes, here is the finished product:
Till next time.....happy R129 / SL500 motoring!
--Jerry
Thursday, July 18, 2013
New Power Antenna and Dash lights
In prep for a little road trip, I finally replaced the rubber temporary antenna.
The original broke off in a car wash --so common with these. The mast was broken and the motor fried. So I ordered a used Hershman power antenna off Ebay and it arrived yesterday.
So here is the "new" power antenna. Came off a "99 model. Love these cars as the series spans 11 years and the parts are interchangeable.
Now the fun begins, had to rip the trunk apart and remove the old antenna.
And here is the finished product!
Much better than this!
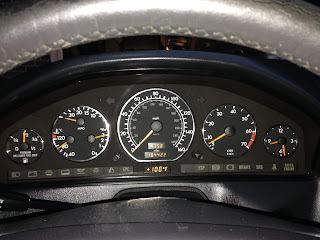
And since I was in a Mr. Handyman mood, I replaced all the lights on the dash cluster as 1 burned out --so I replaced all of them, so all gauges would be at the same brightness. I know....
What a cool looking dash, if I say so myself...
The original broke off in a car wash --so common with these. The mast was broken and the motor fried. So I ordered a used Hershman power antenna off Ebay and it arrived yesterday.
So here is the "new" power antenna. Came off a "99 model. Love these cars as the series spans 11 years and the parts are interchangeable.
And here is the finished product!
Much better than this!
And since I was in a Mr. Handyman mood, I replaced all the lights on the dash cluster as 1 burned out --so I replaced all of them, so all gauges would be at the same brightness. I know....
What a cool looking dash, if I say so myself...
Sunday, June 30, 2013
Old with the Old and in with the New (Windows)
The old windows had completely detached from the top and cracked. So we ordered some replacement materiel from from R129Motoring.com. They were pleasant to deal with and their site had plenty of install videos and other instructional documentation. So first things first, removal of the old windows from the top.
After the cut, the fun begins. It took about 20 minutes to properly fit the back window. BTW, it was 90 degrees that day and the bugs were biting! It took 5 hours to sew the replacement window in!
That was 2 weeks ago. Today I had some time on my hands --due to a rain out of a planned cookout. Back to the dinning room for some more cutting!
Much easier to cut out. 2 Hours later the right side is in. I was so focused, I didn't take any pics.
I did take some of the left side going in. My lovely assistant, Lin is setting and pinning the left window for me.
Now it is time to sew it in. As you see, one stitch at a time. This one went in much easier than the right
At here is the finished product.
Saturday, June 8, 2013
Dash Rings Installed
The Rings are installed and here are some pics from the install.
This is how the dash currently looks on a stock 96 SL500.
The rings I am going to install are found on the 1999 - 2002 Models
On the left, I demonstrate a little trick to trick to loosen the dash before I use the puller tool to yank the cluster out of the dash. (use an old card just in case in breaks)
After a quick yank with the Dash Tool, the dash cluster is out. For those looking to do this to your SL, there are four plugs that are attached to the back of the cluster....
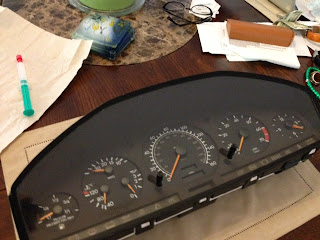
Now it is time for the real fun. There are two torx-10 screws in the back. Remove them and pop the 5 clips open and the cluster comes apart.
Here are the gauges without the dash cover
Here is the cluster molding without the gauges.
An now, it's back together again!! Just adding the rings and the dash is transformed -- pretty cool huh?
Next project will be a repair on the soft top's windows. Until then, happy R129/SL500 motoring!!
Thursday, June 6, 2013
Weekend Project
My tools just arrived for this weekend's project.
Here are the dash rings, so SB's cluster will look like Fritz's
When all done, should look like this.
Here are the dash rings, so SB's cluster will look like Fritz's
Here is a pic of the dash cluster puller tool. Now say that really fast!!
Stayed tuned for the install!
Wednesday, June 5, 2013
New Rims for the Silver Bullet
So we had a flat tire and we when we put the spare on, we noticed how "new" the rim looked. It looked great on the car --made a big difference.
So I had an idea, check eBay for some for some used spare rims. So I found some great deals.
Here is a pic of the old rims, they were bent and the chrome was peeling off.
Here is a pic of one of the new rims from eBay.
These will be the winter rims. The summer rims will be the 18inch Silver Arrow Albieros. Just need to save up for those!
Tuesday, June 4, 2013
First Post for the Blog
Join us as we share our progress in the makeover of the Silver Bullet from a plain old SL500 into a special Sport Edition SL500. The title picture is Silver Bullet with Fritz at our old house in Alexandria. We have made some mods since then.
So far I have new windows for the Soft-top, Chrome rings for the Dash, new power antenna, new headlight washer motor.
Down the road, we will get the AMG Sport Kit, new 18inch Silver Arrow Incenio Albireo rims, Brilliant Silver (paint code 744) paint. Nappa Leather on the seats, Wood/Leather Steering wheel. Bi-Zeon Headlights and upgraded rear taillights.
I'll add to this list as I cruise eBay for more parts!
When Complete, Silver Bullet will look like this:
Current Modifications / Restoration
Cosmetics:
New Headlight Bezels, Panoramic Roof. Factory Rim Replacement, New Tires, New/Correct wiperUnder the hood:
Complete Cooling system replacement, Suspension replacement, new valve cover gaskets, Exhaust Air Sensor, Soft-top release piston assembly. K & N filters, new plugs and wires.Planned Upgrades
Where to begin. Lots in the works and parts are showing up daily!So far I have new windows for the Soft-top, Chrome rings for the Dash, new power antenna, new headlight washer motor.
Down the road, we will get the AMG Sport Kit, new 18inch Silver Arrow Incenio Albireo rims, Brilliant Silver (paint code 744) paint. Nappa Leather on the seats, Wood/Leather Steering wheel. Bi-Zeon Headlights and upgraded rear taillights.
I'll add to this list as I cruise eBay for more parts!
When Complete, Silver Bullet will look like this:
Subscribe to:
Comments (Atom)


.JPG)


